
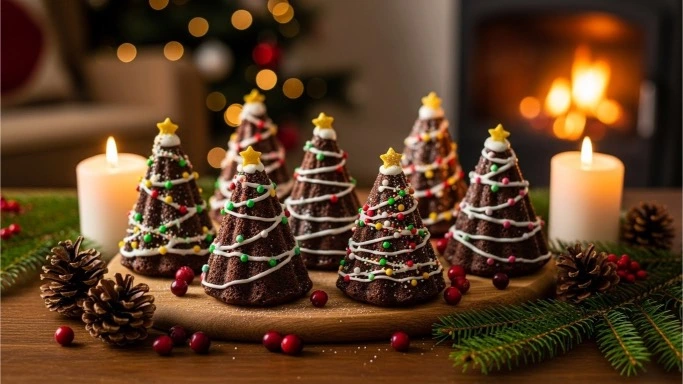
Chocolate Christmas tree cakes are one of those holiday treats that instantly spark joy. They look festive, taste rich and chocolatey, and feel surprisingly special — even though they’re much easier to make than most people expect.
If you’ve ever admired those iconic store-bought Christmas tree cakes and thought, “I wish I could make these at home,”this guide is for you. We’re going to walk through how to make chocolate Christmas tree cakes step by step, using simple tools, real chocolate, and methods that actually work in a home kitchen.
No fancy pastry skills required. Just good chocolate, a little patience, and a love for holiday baking.
What Are Chocolate Christmas Tree Cakes?
Chocolate Christmas tree cakes are festive, tree-shaped chocolate cakes layered with filling and coated in chocolate. Some versions use ganache, others use chocolate glaze, and many are finished with decorative icing lines to resemble garland.
At their core, they’re a soft chocolate cake + creamy filling + chocolate coating — shaped like a Christmas tree.
Homemade versions have a big advantage:
you control the ingredients, sweetness, and quality of chocolate.
If you enjoy festive chocolate projects, you’ll also love How to Make Christmas Chocolate Gifts.
Why Make Chocolate Christmas Tree Cakes at Home?
There are three big reasons people love making these at home:
- They taste better
Homemade chocolate cakes use real cocoa and real butter. No waxy coatings or artificial flavors. - They’re customizable
You can make them darker, less sweet, gluten-free, or dairy-free if needed. - They’re a holiday experience
Baking and decorating these cakes becomes part of the celebration — especially with kids or guests.
Shaping cakes at home is easier than most people think when you start with a sheet cake.
Tools You’ll Need (Nothing Fancy)
You don’t need specialty molds. Here’s what actually works:
- One 9×13-inch baking pan
- Parchment paper
- A sharp knife
- Offset spatula or butter knife
- Baking sheet
- Wire rack
- Microwave-safe bowl or double boiler
Optional but helpful:
- Piping bag or zip-top bag
- Cooling rack placed over parchment
Ingredients Overview
For the Chocolate Cake
- All-purpose flour
- Unsweetened cocoa powder
- Baking powder and baking soda
- Salt
- Sugar
- Eggs
- Milk or buttermilk
- Oil or melted butter
- Vanilla extract
For the Filling
You can choose:
- Vanilla buttercream
- Chocolate buttercream
- Marshmallow cream filling
For the Chocolate Coating
- Dark or milk chocolate (real chocolate, not candy melts)
- Heavy cream or coconut cream (for ganache)
For help choosing chocolate, see How to Store Chocolate to Keep It Fresh: Tips from Experts.
Step 1: Bake the Chocolate Sheet Cake
Start with a simple, moist chocolate cake. Sheet cakes work best because they bake evenly and cut cleanly.
- Preheat your oven to 350°F (175°C).
- Line a 9×13-inch pan with parchment.
- Mix dry ingredients in one bowl.
- Whisk wet ingredients in another.
- Combine gently until smooth.
- Pour into the pan and bake for 25–30 minutes.
Let the cake cool completely before cutting. Warm cake will crumble.
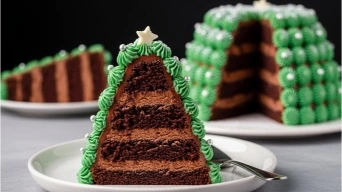
Step 2: Cut the Christmas Tree Shapes
This is where people get nervous — but it’s easier than it looks.
- Place the cooled cake on a cutting board.
- Cut the cake in half lengthwise.
- From each half, cut a triangle shape (wide base, narrow top).
- Save scraps for snacking or cake pops.
You’ll end up with two tree-shaped cake layers per cake.
Tip: Don’t aim for perfection. Slightly uneven edges look charming once coated.
Step 3: Add the Filling
Place one tree layer flat side down.
- Spread an even layer of filling, stopping short of the edges.
- Gently place the second tree on top.
- Press lightly to secure.
Chill the assembled cakes for 30 minutes. This step is crucial — it keeps the layers from sliding during coating.
If you enjoy layered desserts, check out The Best Chocolate Strawberry Cake You’ll Ever Make.
Step 4: Prepare the Chocolate Coating
A simple chocolate ganache works best.
- Heat cream until just steaming.
- Pour over chopped chocolate.
- Let sit for 2 minutes.
- Stir slowly until glossy.
Let the ganache cool slightly. It should be pourable, not runny.
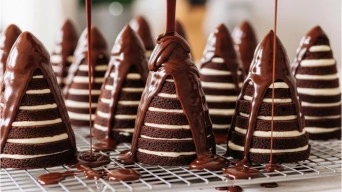
Step 5: Coat the Cakes
Place chilled cakes on a wire rack over parchment.
- Spoon ganache over the top.
- Let it drip naturally down the sides.
- Use a spatula only if needed.
Don’t overwork it. Smooth ganache comes from gravity, not spreading.
Chill again for 15–20 minutes.
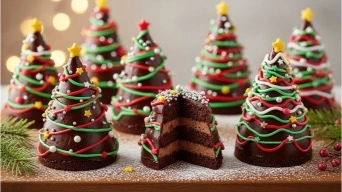
Step 6: Decorate Like a Christmas Tree
This is the fun part.
Classic Decorations
- White icing zigzags (garland look)
- Colored sprinkles
- Mini chocolate stars
- Powdered sugar “snow”
Use a piping bag or small zip-top bag with the corner snipped.
Less is more. A few clean lines look more elegant than heavy decoration.
For more festive dessert ideas, see The Best Christmas Chocolates’ Recipes You Can Make at Home.
Common Mistakes to Avoid
- Cutting the cake while warm
- Skipping the chilling steps
- Using candy melts instead of real chocolate
- Overdecorating
Can You Make These Ahead of Time?
Yes — and they’re perfect for it.
- Store coated cakes in the fridge for up to 3 days.
- Freeze uncoated cakes up to 1 month.
- Decorate the day you serve for best appearance.
Learn more about chocolate shelf life in Does Cocoa Powder Go Bad? How to Tell If It’s Still Good.
Variations to Try
- Dark chocolate version (70% cocoa)
- Peppermint filling
- Gluten-free cake base
- Vegan ganache using coconut cream
Short FAQ
Can I use a boxed cake mix?
Yes. Choose a rich chocolate variety and let it cool fully.
Do I need special molds?
No. A knife and sheet cake work perfectly.
Why did my coating look dull?
Chocolate was too cold or overheated. Let ganache cool slightly before pouring.
Can kids help with this recipe?
Absolutely. Decorating is especially fun for kids.
The Takeaway
Making chocolate Christmas tree cakes at home is far more achievable than most people realize. With a simple chocolate cake, a creamy filling, and a smooth ganache, you can create a festive dessert that looks special and tastes even better.
These cakes aren’t about perfection. They’re about holiday joy, shared moments, and real chocolate flavor. Whether you serve them at a party or wrap them as edible gifts, they’re guaranteed to become a new holiday favorite.
If your Diet is gluten-free, read this article about the best gluten-free chocolates for baking.
Discover more chocolate wisdom on ChocoTalks.com — where every bite tells a story.