
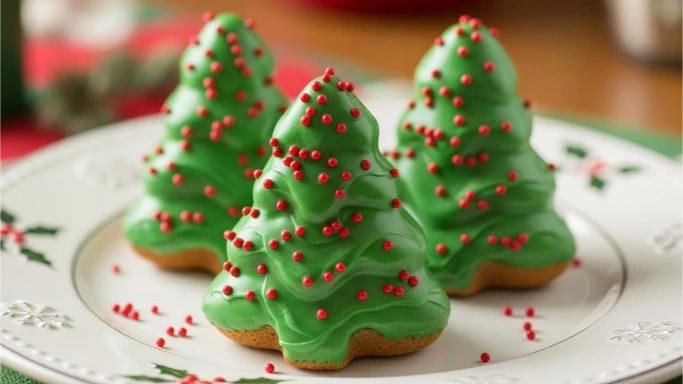
If there’s one snack that instantly signals the start of the holiday season, it’s Little Debbie Christmas Tree Cakes. The moment those green, sprinkle-covered cakes hit store shelves, something clicks. Suddenly, it feels like Christmas is officially on the way.
For many of us, these iconic treats are wrapped up in memories — school lunches, holiday movie nights, and sneaking an extra one from the pantry when no one was looking. They’re sweet, soft, creamy, and unmistakably festive.
But what if you could recreate that same joy at home — with better ingredients, richer flavor, and a texture that feels even more special?
In this guide, we’ll break down a homemade Little Debbie Christmas Tree Cakes–style recipe you’ll genuinely love, along with tips, variations, and answers to the most common questions people have about these nostalgic treats.
Why Little Debbie Christmas Tree Cakes Are So Popular
Little Debbie Christmas Tree Cakes aren’t just snacks. They’re a seasonal tradition.
Their popularity comes from a few simple things:
- A soft vanilla cake that stays tender
- A sweet, creamy filling in the center
- A thin chocolate coating that seals everything together
- Festive green icing and red sprinkles that scream “holiday”
They’re easy to eat, instantly recognizable, and available for a limited time — which only adds to the excitement.
Marky explains why limited-edition seasonal foods trigger nostalgia and emotional attachment.
Homemade vs. Store-Bought: What’s the Difference?
Let’s be honest. Store-bought Christmas Tree Cakes are fun — but homemade versions bring something extra.
Homemade Versions Offer:
- Better ingredients
- Less artificial aftertaste
- Custom sweetness levels
- A fresher, softer texture
Plus, when you make them yourself, you get the joy of baking and decorating — which becomes part of the holiday experience.
If you enjoy festive chocolate projects, you may also love How to Make Chocolate Christmas Tree Cakes Step by Step.
What Makes These Cakes Taste “Just Right”
To recreate the Little Debbie vibe, you need balance.
Not too rich.
Not too dry.
Not overly sweet.
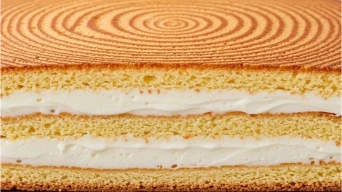
The key is a light vanilla cake, a whipped cream-style filling, and a thin chocolate coating — not a thick ganache.
This recipe focuses on texture first, then flavor.
Ingredients You’ll Need
For the Vanilla Cake
- All-purpose flour
- Cornstarch (for softness)
- Baking powder
- Salt
- Sugar
- Eggs
- Vegetable oil
- Milk
- Vanilla extract
For the Cream Filling
- Unsalted butter
- Powdered sugar
- Marshmallow cream
- Vanilla extract
- Heavy cream
For the Chocolate Coating
- Semi-sweet or milk chocolate
- Neutral oil (like coconut or vegetable oil)
For Decoration
- Green icing or tinted frosting
- Red sprinkles
Step 1: Make the Soft Vanilla Cake
Preheat your oven to 350°F (175°C). Line a 9×13-inch pan with parchment paper.
In one bowl, whisk:
- Flour
- Cornstarch
- Baking powder
- Salt
In another bowl, mix:
- Eggs
- Sugar
- Oil
- Milk
- Vanilla
Combine wet and dry ingredients gently until smooth.
Pour into the pan and bake for 20–25 minutes. The cake should spring back lightly when touched.
Let it cool completely.
Serious Eats explains why gentle mixing keeps cakes light: https://www.seriouseats.com/how-to-mix-cake-batter-properly)
Step 2: Cut the Tree Shapes

Once cooled, lift the cake out using parchment.
Use a sharp knife to cut Christmas tree shapes:
- Cut the cake in half lengthwise.
- From each half, cut triangle-shaped trees.
- Save scraps for snacking or cake pops.
Chill the cut cakes for 20 minutes to firm them up.
Cutting shapes is also covered in How to Make Chocolate Christmas Tree Cakes Step by Step.
Step 3: Make the Cream Filling
In a bowl, beat:
- Butter until fluffy
- Add powdered sugar gradually
- Mix in marshmallow cream and vanilla
- Add heavy cream until light and spreadable
This filling should be airy, not stiff.
Spread a thin layer onto one tree, then sandwich with another.
Chill again for 30 minutes.
Step 4: Coat with Chocolate
Melt chocolate with a small amount of oil until smooth.
Dip or spoon chocolate over the chilled cakes. Let excess drip off naturally.
Place on parchment and chill until set.
The coating should be thin — this keeps the texture true to the original.
For chocolate handling tips, see How to Store Chocolate to Keep It Fresh: Tips from Experts.
Step 5: Decorate Like the Original
Once the chocolate sets:
- Pipe green zigzag lines across the cake
- Add red sprinkles for ornaments
- Let decorations set before serving
Keep designs simple. That’s part of the charm.
How Close Does This Taste to the Original?
Very close — but better.
Homemade versions are:
- Less waxy
- More flavorful
- Softer inside
- Less artificially sweet
Most people who try them say they taste like the grown-up version of the classic.
Variations You’ll Want to Try
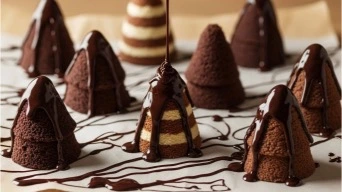
Chocolate Cake Version
Swap vanilla cake for chocolate cake for a richer twist.
Peppermint Filling
Add a drop of peppermint extract to the cream filling.
Dark Chocolate Coating
Use dark chocolate for a less sweet finish.
Gluten-Free Option
Use a 1:1 gluten-free flour blend.
You may enjoy pairing these with The Best Christmas Chocolates’ Recipes You Can Make at Home.
Storage and Make-Ahead Tips
- Store in an airtight container in the fridge for up to 5 days
- Freeze uncoated cakes for up to 1 month
- Decorate the day of serving for best appearance
Are Little Debbie Christmas Tree Cakes Healthy?
Let’s be real — they’re a treat.
But homemade versions let you:
- Reduce sugar
- Use better fats
- Control portion size
Enjoy them mindfully, as part of the season — not as an everyday snack.
Balance matters, and you can read more in Christmas Chocs and Cozy Nights: How to Sweeten the Season.
Short FAQ
Can I use a boxed cake mix?
Yes. Choose a vanilla or white cake mix and let it cool fully.
Do I need special molds?
No. A knife and steady hand work perfectly.
Why did my chocolate crack?
Chocolate was too cold or too thick. Add a bit of oil and let it cool slightly before coating.
Can kids help with this recipe?
Absolutely. Decorating is especially fun for kids.
The Takeaway
Little Debbie Christmas Tree Cakes are more than a snack — they’re a holiday memory wrapped in chocolate and sprinkles.
Making them at home lets you relive that nostalgia while upgrading the flavor and quality. Whether you’re baking with family, recreating childhood favorites, or starting a new tradition, this recipe brings warmth and joy to your kitchen.
So this season, don’t just buy the memory — bake it.
Discover more chocolate wisdom on ChocoTalks.com — where every bite tells a story.