
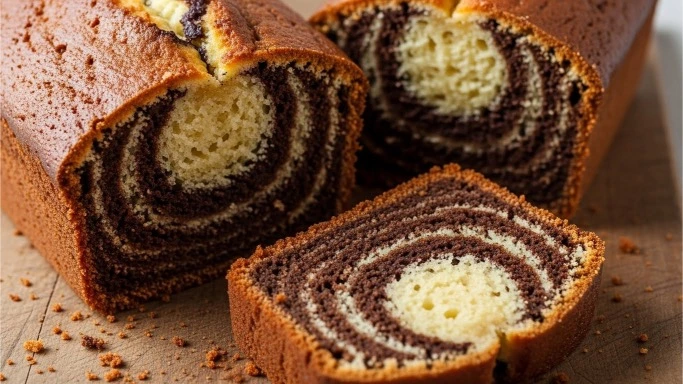
There’s something quietly magical about slicing into a loaf and seeing that ribbon of chocolate winding through the crumb.
A loaf with a chocolate swirl doesn’t shout for attention. It doesn’t need frosting or decoration. It wins you over slowly—slice by slice—through contrast. Light and dark. Vanilla and chocolate. Soft crumb and rich cocoa.
The good news? You don’t need advanced baking skills to get that bakery-worthy swirl. You just need the right method, a little patience, and a few small tricks that make all the difference.
This guide walks you through how to make a loaf with a chocolate swirl step by step, so your loaf looks beautiful and tastes incredible.
What Makes a Chocolate Swirl Loaf So Special?
At its heart, this loaf is about balance.
- Not too sweet
- Not too rich
- Not plain, not heavy
The swirl gives you contrast without overwhelming the loaf. Every slice looks slightly different, which makes it feel homemade in the best possible way.
It’s perfect for:
- Afternoon coffee
- Light dessert
- Breakfast with tea
- Sharing (or not sharing at all)
If you enjoy simple chocolate bakes like this, ChocoTalk.com also has a helpful guide on using cocoa powder in baking that pairs beautifully with swirl loaves.
Choosing the Right Base for Your Loaf
Before we talk about swirling, let’s talk about the base.
A good swirl loaf needs a batter that is:
- Soft but sturdy
- Pourable, not runny
- Neutral enough to let chocolate shine
Best Bases for a Chocolate Swirl Loaf
- Vanilla loaf cake
- Yogurt loaf
- Sour cream loaf
- Simple butter loaf
Avoid batters that are too airy or very thin. They won’t hold the swirl properly.
Ingredients You’ll Need (Simple and Reliable)
This recipe uses pantry-friendly ingredients. Nothing fancy.
For the Vanilla Batter
- All-purpose flour
- Baking powder
- Salt
- Unsalted butter (softened)
- Sugar
- Eggs (room temperature)
- Milk or yogurt
- Vanilla extract
For the Chocolate Swirl
- Cocoa powder
- Sugar
- Milk or hot water
The cocoa swirl is intentionally thicker than the vanilla batter. That’s key.
Step 1: Prepare Your Pan and Oven
Start simple.
- Preheat oven to 350°F (175°C)
- Line a loaf pan with parchment paper
- Lightly grease the sides
Parchment helps you lift the loaf cleanly and protects the swirl pattern.
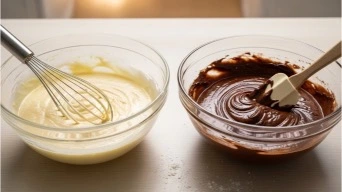
Step 2: Make the Vanilla Batter
In a bowl, whisk together:
- Flour
- Baking powder
- Salt
In another bowl, cream:
- Butter and sugar until light
- Add eggs one at a time
- Mix in vanilla
Alternate adding:
- Dry ingredients
- Milk or yogurt
Mix just until combined. Stop early, not late.
Overmixing makes the loaf dense.
Step 3: Create the Chocolate Swirl Batter
Take about ⅓ of the vanilla batter and place it in a separate bowl.
Add:
- Cocoa powder
- A little sugar
- Milk or hot water
Stir until smooth and slightly thicker than the vanilla batter.
This thickness difference helps the swirl stay defined instead of blending.
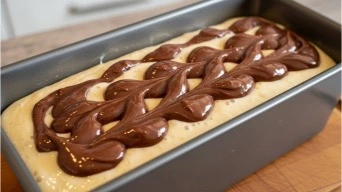
Step 4: Layer the Batter (This Is Where Art Begins)
Now comes the fun part.
Layering Method
- Pour half the vanilla batter into the pan
- Add spoonfuls of chocolate batter on top
- Cover with remaining vanilla batter
- Add more chocolate batter in spoonfuls
Don’t spread. Let gravity do the work.
Step 5: Create the Swirl (Less Is More)
Use a butter knife or skewer.
- Insert it into the batter
- Make gentle figure-eight motions
- Stop early
Two to three passes is enough.
Too much swirling blends the batters and ruins contrast.
Step 6: Bake for Beautiful Results
Place the loaf in the center of the oven.
Bake for 45–55 minutes, depending on your oven.
Check doneness by inserting a toothpick:
- Moist crumbs are fine
- Wet batter is not
If the top browns too fast, tent loosely with foil.
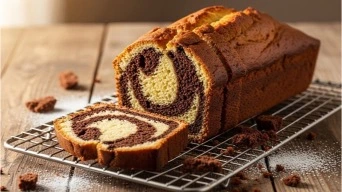
Step 7: Cooling Matters More Than You Think
Let the loaf cool:
- 15 minutes in the pan
- Then lift out and cool fully on a rack
Cutting too early smears the swirl and compresses the crumb.
According to National CACFP Association, proper cooling helps baked goods set structure.
Common Mistakes (And How to Avoid Them)
Swirl Disappears
You over mixed. Use fewer strokes next time.
Chocolate Sinks
Chocolate batter was too thin. Thicken it slightly.
Dry Loaf
Over baked or too much flour.
Dense Texture
Over mixing the base batter.
Flavor Variations You Can Try
Once you master the basic loaf, variations are easy.
Banana Chocolate Swirl Loaf
Replace some milk with mashed banana.
Orange Chocolate Swirl
Add orange zest to vanilla batter.
Coffee Chocolate Swirl
Add espresso powder to the cocoa mixture.
How to Store a Chocolate Swirl Loaf
- Store tightly wrapped at room temperature
- Best within 3 days
- Freeze slices for up to 2 months
Wrap well to prevent drying.
Short FAQ: Loaf With a Chocolate Swirl
Can I use melted chocolate instead of cocoa?
Yes, but cocoa gives a cleaner swirl and lighter texture.
Why is my swirl muddy?
Too much swirling or batters too similar in thickness.
Can I make this loaf dairy-free?
Yes. Use plant milk and dairy-free butter.
Is this a cake or bread?
It’s a loaf cake—soft like cake, sliceable like bread.
Final Thoughts
A loaf with a chocolate swirl is proof that baking doesn’t need to be complicated to be impressive. With the right layering, gentle swirling, and a balanced batter, you get a loaf that looks beautiful inside and out.
It’s the kind of bake that feels calming to make and comforting to eat.If you enjoy understanding the why behind baking—not just the steps—you’ll feel right at home on ChocoTalk.com, where every slice tells a story.