
How to make chocolate crepe cake
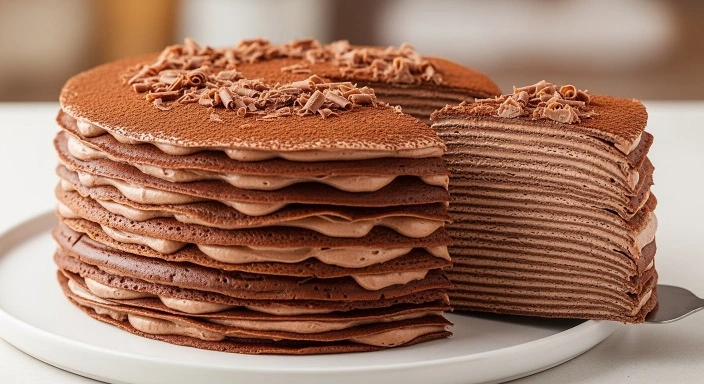
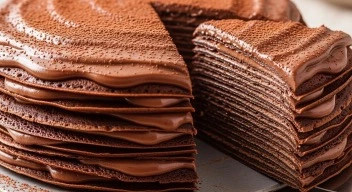
Chocolate crepe cake looks like something you’d order at a patisserie and admire before cutting into it. Dozens of delicate crepes. Silky chocolate layers. Clean slices that show off every layer.
But here’s the truth most people don’t realize:
Chocolate crepe cake is more about patience than difficulty.
There’s no baking, no fancy tools, and no pressure to get things perfect. Once you understand the rhythm — crepe, spread, stack — the process becomes almost meditative. And the result feels far more impressive than the effort it takes.
Let’s walk through how to make a chocolate crepe cake at home, step by step, in a way that’s approachable, forgiving, and genuinely enjoyable.
Chocolate Crepe Cake Recipe (Detailed & Beginner-Friendly)
This recipe creates a classic chocolate crepe cake with thin cocoa crepes and a smooth chocolate cream filling. You can keep it simple or dress it up later.
Ingredients You’ll Need
For the Chocolate Crepes
- 1 cup all-purpose flour
- 2 tablespoons unsweetened cocoa powder
- 2 tablespoons sugar
- ¼ teaspoon salt
- 3 large eggs
- 1½ cups whole milk
- 2 tablespoons melted butter
- 1 teaspoon vanilla extract
For the Chocolate Cream Filling
- 1½ cups heavy cream (cold)
- 6 ounces dark or semi-sweet chocolate, finely chopped
- 2 tablespoons powdered sugar (optional, adjust to taste)
Step 1: Make the Chocolate Crepe Batter
In a mixing bowl, whisk together the flour, cocoa powder, sugar, and salt. In a separate bowl, whisk the eggs, milk, melted butter, and vanilla.
Slowly combine the wet ingredients with the dry, whisking until smooth. The batter should be thin — similar to heavy cream.
Tip: If you see small lumps, don’t stress. Letting the batter rest helps.
Cover and rest the batter for at least 30 minutes. This relaxes the gluten and gives you softer, more flexible crepes.
Step 2: Cook the Crepes
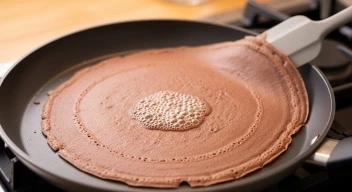
Heat a non-stick pan over medium heat and lightly butter it. Pour about ¼ cup of batter into the pan, swirling quickly to coat the surface.
Cook for about 45–60 seconds, until the edges lift easily. Flip and cook for another 20–30 seconds.
Transfer to a plate and repeat. Stack the crepes as you go.
You should end up with 18–22 thin crepes. Don’t worry if a few aren’t perfect — those go in the middle.
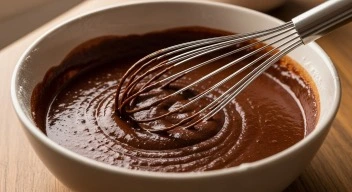
Step 3: Prepare the Chocolate Cream Filling
Gently heat the cream until just steaming (not boiling). Pour it over the chopped chocolate and let it sit for 2 minutes. Stir until smooth and glossy.
Once the mixture cools to room temperature, whip lightly until it thickens to a spreadable, silky consistency.
If you want more chocolate depth, techniques from How to Melt Chocolate Chips Easily apply beautifully here.
Step 4: Assemble the Chocolate Crepe Cake
Place one crepe on a serving plate. Spread a thin, even layer of chocolate cream on top.
Repeat: crepe → cream → crepe → cream.
Work gently and keep layers thin. The magic of a crepe cake comes from many delicate layers, not thick fillings.
Finish with a crepe on top. Chill the cake for at least 2 hours before slicing.
What Makes Chocolate Crepe Cake So Special?
Unlike traditional cakes, chocolate crepe cake:
- Has no baking
- Relies on texture and balance
- Feels elegant without being heavy
Each slice delivers chocolate gradually, layer by layer, instead of all at once.
Chocolate Choices That Make a Difference
The chocolate you use shapes the entire cake.
- Dark chocolate → deeper flavor, less sweetness
- Semi-sweet chocolate → smoother and more crowd-friendly
Understanding chocolate composition helps here — concepts explained in Chocolate Liquor Explained: A Simple Guide for Chocolate Lovers apply directly to crepe cakes.
Common Mistakes (and How to Avoid Them)
Crepes tearing?
Your batter may be too thick. Add a splash of milk.
Cake sliding while stacking?
Your filling is too warm. Chill it slightly before spreading.
Layers look uneven?
That’s normal. Chill, then trim the edges with a knife for a clean finish.
Make-Ahead & Storage Tips
Chocolate crepe cake actually improves after resting.
- Make it 1 day ahead for best slicing
- Store covered in the fridge up to 3 days
- Avoid freezing (texture suffers)
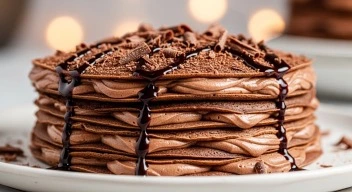
Flavor Variations Worth Trying
Once you master the base, you can experiment:
- Add espresso powder to the cream
- Layer with raspberry jam every 4–5 crepes
- Use milk chocolate for a softer profile
If you enjoy elegant chocolate desserts, this pairs well with techniques used in How to Make Chocolate Truffles at Home — same attention to texture, different format.
FAQ: Chocolate Crepe Cake
Is chocolate crepe cake difficult to make?
Not difficult — just time-based. Each step is simple.
Can I make it without cocoa powder?
Yes, but it won’t be chocolate crepe cake. Cocoa gives depth.
Do I need a special pan?
No. A good non-stick skillet works fine.
Why chill before slicing?
Chilling firms the layers and gives clean cuts.
Can I reduce the sugar?
Yes. Adjust the filling sweetness to taste.
The Takeaway
Chocolate crepe cake may look elegant and impressive, but at its heart, it’s a dessert built on patience, simple ingredients, and a love for chocolate. Thin crepes, soft layers of cream, and gentle chocolate flavor come together to create something that feels special without being complicated.
What makes this cake truly rewarding is the process. Each crepe you stack adds character, and every slice tells the story of time and care. You can keep it classic, adjust the sweetness, or personalize it with your favorite fillings — the result is always a dessert that feels homemade in the best way.
Whether you serve it for a celebration or as a quiet weekend treat, chocolate crepe cake proves that slow, thoughtful baking often leads to the most memorable desserts.
Would you keep your chocolate crepe cake simple, or add your own twist to the layers?