
Learn how to store cocoa powder
You open your pantry cabinet, reach for that cocoa powder you bought three months ago, and pause. The container feels a bit sticky. When you finally pry open the lid, you’re greeted by hard clumps instead of silky powder. Sound familiar?
I’ve been there—and I’ve learned the hard way that cocoa powder demands respect when it comes to storage. Unlike most pantry staples, cocoa powder has unique enemies: moisture, heat, light, and oxygen all conspire to steal its rich chocolate flavor and velvety texture.
The good news? Cocoa powder’s naturally low moisture prevents bacterial and mold growth, and high polyphenol levels protect against oxidation Santa Barbara Chocolate, which means it can last for years when stored correctly. However, improper storage can turn even the best cocoa powders for baking—whether you’ve invested in premium Valrhona or picked up budget-friendly Hershey’s—into flavorless dust in just weeks.
In this guide, I’ll walk you through everything you need to know about storing cocoa powder properly—from choosing the right containers to understanding ideal temperatures, plus what to do if you’ve already made storage mistakes. Whether you bake daily or save cocoa for special occasions, these techniques will keep your chocolate powder fresh and flavorful.
Understanding Why Cocoa Powder Storage Matters
What Makes Cocoa Powder Vulnerable
Before diving into storage solutions, let’s understand what we’re protecting against.
Cocoa powder is essentially ground cocoa solids with most of the cocoa butter removed. This process leaves behind concentrated chocolate flavor and beneficial compounds like flavonoids and antioxidants. However, this also creates a product that’s surprisingly sensitive to its environment.
The Four Main Threats:
Moisture, oxidation, heat, and light exposure can all cause cocoa powder degradation. Each threat affects the powder differently, but all lead to the same disappointing result: loss of that deep, complex chocolate flavor you paid for.
How Long Does Cocoa Powder Actually Last?
Here’s what might surprise you: cocoa powder doesn’t really “expire” in the traditional sense.
Unopened cocoa powder lasts about 2–3 years, and after opening, it stays good for around 1 year if stored in a cool, dry place in an airtight container. However, studies show properly stored cocoa can remain usable for much longer.
The catch? While safe to consume for years, flavor potency gradually fades. Research found that cocoa 6 years old was notably “duller” and “weaker” than fresher powder, though still perfectly fine to consume.
Think of it like whole spices versus ground spices—they don’t go bad, but they lose their punch over time.
The Perfect Storage Environment for Cocoa Powder
Temperature Requirements
Temperature control is your first line of defense in preserving cocoa powder quality.
Ideal range: Between 60–70°F (15–21°C) Santa Barbara Chocolate
This might sound specific, but here’s why it matters: temperatures above 75°F accelerate flavor degradation and can cause the small amount of cocoa butter still present in the powder to separate. According to Clemson University’s Home & Garden Information Center, chocolate products should be stored at room temperature between 65℉ and 70℉, with relative humidity lower than 50-55%. These same principles apply to cocoa powder storage.
Meanwhile, temperatures below 60°F aren’t harmful, but they can create condensation issues when you bring the powder to room temperature for use.
Most standard kitchen pantries fall within this range naturally—away from heat sources like stoves, dishwashers, and sunny windows.
Why Your Refrigerator Is Actually the Worst Place
I know it seems counterintuitive. Cold equals preservation, right? Not for cocoa powder.
Refrigerators are humid environments, and an ideal temperature for keeping cocoa powder is between 60 and 70 degrees Fahrenheit—a refrigerator is much cooler. The humidity can promote mold growth and cause clumping.
Additionally, cocoa powder absorbs odors like a sponge. Store it in the fridge, and your chocolate brownies might taste subtly like last night’s garlic chicken.
Exception: If you live in an extremely hot climate where your kitchen regularly exceeds 80°F, freezing (not refrigerating) becomes a viable option—but only with proper precautions, which I’ll cover later.
Humidity Control: The Silent Killer
This is where most storage failures happen.
Aim for humidity below 65–75% in your storage area. Above this threshold, cocoa powder begins absorbing moisture from the air, leading to:
- Hard clumps that won’t break apart
- Texture changes from silky to gritty
- Mold growth in extreme cases
- Loss of that fine, dusty consistency needed for smooth mixing
Pro tip: If you live in a humid climate (think coastal areas or tropical regions), invest in a small hygrometer for your pantry. These inexpensive devices (around $5-10) show you exactly what humidity level your cocoa is experiencing.
Light and Oxygen Protection
Light and oxygen work together to degrade cocoa powder through oxidation.
Exposure to oxygen can cause degradation in nutrients over time, and in cocoa powder, oxidation will cause it to go rancid thus lose flavor.
This is why cocoa powder typically comes in opaque containers rather than clear jars. Light—especially direct sunlight—speeds up oxidation dramatically.
The solution is simple: keep cocoa powder in dark containers stored in a dark place. Your pantry cabinet (as opposed to open shelving) is perfect.
Choosing the Right Storage Containers
Best Container Materials
Not all containers are created equal when it comes to cocoa powder storage.
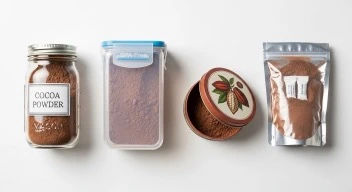
Top choices:
Glass jars with airtight seals (★★★★★)
- Mason jars with two-piece lids work perfectly
- Completely non-reactive
- Blocks light when amber-colored
- Easy to clean and reuse
- Downside: Can break if dropped
You can find quality mason jars with airtight lids on Amazon .
Food-grade plastic containers with gasket seals (★★★★☆)
- Look for ones with a silicone gasket-type of seal like Lock-n-Lock Containers
- Lightweight and unbreakable
- Must be BPA-free
- Some plastics can retain odors over time
Metal tins with tight-fitting lids (★★★★☆)
- Good light protection
- Durable
- Ensure the interior coating is intact
- Can dent, compromising the seal
Mylar bags with oxygen absorbers (★★★★★ for long-term)
- Mylar bags with oxygen absorbers can store cocoa powder for as long as 20 years
- Excellent for bulk storage or emergency preparedness
- Not practical for daily use
- Requires heat sealing equipment
Container Size Matters
Here’s a mistake I made early on: storing all my cocoa powder in one large container.
Every time you open the container, you expose all the powder to fresh air and potential contamination. Instead, use the “working container” method:
Large storage container: Holds the bulk of your cocoa powder, opened infrequently
Small daily-use container: Holds 1-2 weeks’ worth, refilled from the bulk container as needed
This minimizes exposure for the majority of your cocoa while keeping convenient access for regular baking.
The Seal Test
Before committing cocoa powder to any container, test the seal:
- Fill the container with water
- Seal it and shake vigorously
- Turn it upside down
- Check for any leaks
If water can escape, so can air enter—and that means moisture and oxidation will affect your cocoa powder.
Step-by-Step: How to Store Cocoa Powder Properly
For Everyday Storage (1-2 Years)
What you’ll need:
- Clean, dry airtight container
- Original cocoa powder package or bulk cocoa
- Label and marker
- Optional: silica gel packets
The process:
Step 1: Choose a low-humidity day
Repackage cocoa powder on a day with low-level humidity to prevent moisture absorption during transfer. Check your weather app—aim for below 60% humidity if possible.
Step 2: Prepare your container
Wash thoroughly with hot, soapy water. Rinse completely to remove any soap residue (cocoa powder will absorb soap flavors). Dry completely—and I mean completely. Even a few drops of water can cause problems. Air-drying overnight is ideal.
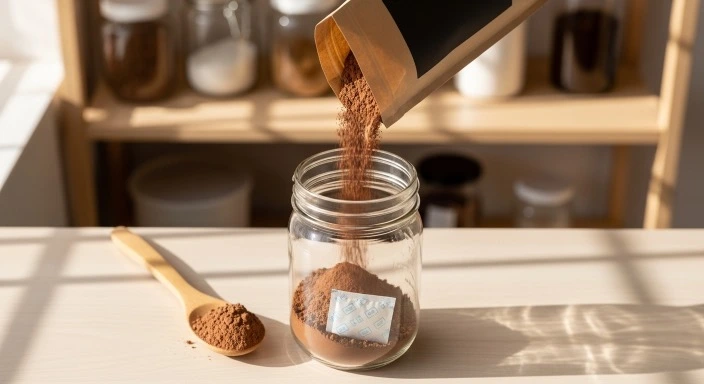
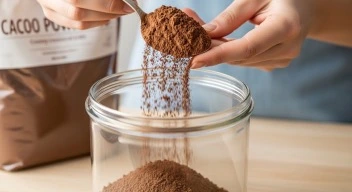
Step 3: Transfer the cocoa
Pour cocoa powder directly into the container using a funnel if the opening is narrow. Avoid creating dust clouds (cocoa powder is incredibly fine and gets everywhere). Fill to about ¾ full, leaving some headspace.
Step 4: Add protection (optional but recommended)
Drop in a food-safe silica gel packet to absorb any residual moisture. These are the same packets found in vitamin bottles—save them and reuse them.
Step 5: Seal and label
Close the container tightly. Label with the purchase date and type of cocoa (natural vs. Dutch-processed). This helps you track freshness and avoid confusion.
Step 6: Store properly
Place in a cool, dark pantry cabinet away from heat sources. Ideal spots include:
- Lower shelves (heat rises)
- Interior walls (less temperature fluctuation)
- Away from dishwashers, ovens, and sinks
For Long-Term Storage (5-20 Years)
If you buy cocoa in bulk or want emergency food storage, long-term methods preserve quality far beyond normal storage.
Method 1: Mylar Bags with Oxygen Absorbers
For serious long-term storage, food preservation experts at Wallaby Goods have tested various methods and found that Mylar bags with oxygen absorbers provide the best protection. Mylar bags with oxygen absorbers can store cocoa powder for as long as 20 years by removing all oxygen from the bag, thus preventing oxidation
What you’ll need:
- Food-grade Mylar bags (5-7 mil thickness)
- Oxygen absorber packets (300cc for quart bags, 500cc for gallon bags)
- Heat sealer or iron
- Bucket for extra protection (optional)
For convenience, you can purchase a complete Mylar bag storage kit with oxygen absorbers on Amazon that includes everything you need—bags in multiple sizes, appropriately-sized oxygen absorbers, and sometimes even a basic heat sealer.
Process:
- Work quickly: Once you open oxygen absorbers, they begin working immediately
- Fill Mylar bags about ¾ full with cocoa powder
- Add oxygen absorber on top of the powder
- Seal immediately using a heat sealer or iron set to medium-high heat
- Double-check seal by gently trying to pull it apart
- Store sealed bags in a bucket or cool, dark location
The oxygen absorbers create a vacuum environment, preventing oxidation. Mylar bags with oxygen absorbers prevent cocoa powder from going rancid and losing essential nutrients.
Method 2: Vacuum Sealing
Vacuum sealing removes most air but not all oxygen, making it suitable for 1-2 year storage rather than decades.
Advantages:
- Easier than Mylar bags
- Equipment is more accessible
- Resealable vacuum containers available
Process:
- Pour cocoa into vacuum-seal bags or containers
- Use vacuum sealer according to manufacturer instructions
- Store in pantry or cool location
Note: Cocoa powder is so fine it can get sucked into vacuum sealers and damage them. Place a paper towel or coffee filter over the powder before sealing to prevent this.
For Freezer Storage
Only use freezer storage if absolutely necessary—typically in hot climates or for very long-term bulk storage.
Critical requirements:
Double-bag everything: You must pack the cocoa powder in two bags before storing it in the freezer to prevent cocoa powder from absorbing any other smells from freezer items.
Allow complete thawing: Remove frozen cocoa powder and let it reach room temperature before opening the container. Opening cold containers causes condensation, which introduces moisture directly into your cocoa powder.
Freezer burn protection: Use airtight freezer bags or containers specifically designed for freezer use. Regular containers may allow freezer burn over time.
Common Storage Mistakes (And How to Fix Them)
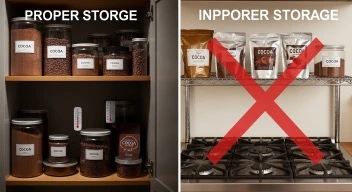
Mistake #1: Storing Above the Stove
I see this constantly—cocoa powder tucked into the cabinet directly above the stovetop.
The problem: Every time you cook, heat rises directly into that cabinet. Temperatures can spike to 90°F or higher, causing cocoa butter to separate and flavors to fade rapidly.
The fix: Move cocoa powder to a lower cabinet or one on a different wall, far from heat sources. If your kitchen lacks cool spots, consider a pantry shelf or even a cool closet.
Mistake #2: Using the Original Package
Many cocoa powders come in bags with simple fold-over tops or metal canisters with poor seals.
The problem: These aren’t airtight. Cocoa powder insists on being stored in an airtight container. Even slight air exposure leads to gradual flavor loss.
The fix: Transfer to proper airtight containers immediately after opening. If you must keep the original packaging, place the entire package inside a larger airtight container or zip-lock bag.
Mistake #3: Contaminating with Wet Spoons
It seems harmless—using a slightly damp measuring spoon or one that touched other ingredients.
The problem: Any moisture introduces a breeding ground for mold. Even worse, bits of other ingredients (like flour or sugar) can attract pantry moths.
The fix: Always use completely dry, dedicated measuring spoons for cocoa powder. Keep a small spoon inside the container if you use it frequently.
Mistake #4: Ignoring Clumping Early On
Small clumps seem normal, right? Just break them up and keep going.
The problem: Initial clumping is a warning sign of moisture exposure. It will get worse, not better. Eventually, you’ll have rock-hard chunks instead of usable powder.
The fix: If you notice clumping starting:
- Sift the powder to remove clumps
- Transfer to a fresh, completely dry container
- Add silica gel packets
- Reassess your storage location’s humidity
Mistake #5: Bulk Buying Without a Storage Plan
Bulk cocoa powder offers great value—but only if you can store it properly.
The problem: That 5-pound bag of cocoa powder is more than most home bakers use in a year. Poor storage means the last pound tastes nothing like the first.
The fix: Divide bulk purchases immediately:
- Portion into multiple smaller containers
- Seal some for long-term storage (Mylar bags)
- Keep one container for current use
- Share excess with fellow bakers (within a few months of purchase)
Food safety consideration: The USDA Food Safety and Inspection Service recommends following proper pantry storage guidelines for all dry goods. While cocoa powder is shelf-stable, proper storage practices prevent contamination and maintain quality. Store cocoa in clean, food-grade containers away from potential contaminants, and always practice good hygiene when handling dry ingredients—use clean, dry utensils and avoid introducing moisture.
How to Tell If Your Cocoa Powder Has Gone Bad
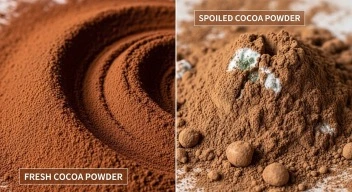
Visual Inspection
Start with a simple look test.
Red flags:
- Mold growth: Fuzzy spots, especially green, white, or black
- Discoloration: Cocoa should be consistent brown (shade depends on type). Gray or faded patches indicate problems
- Excessive clumping: A few clumps are normal, but if the entire container has solidified, moisture has gotten in
- Insects or webbing: Pantry moths love cocoa powder
Normal variations:
- Color differences between natural and Dutch-processed cocoa
- A few small, breakable clumps (especially in humid climates)
- Slight color deepening over time
Smell Test
Your nose is your best friend here.
Take a good sniff (making sure not to get any inside your nose) and see if there are any signs of a sour or foul smell.
Fresh cocoa should smell:
- Rich and chocolatey
- Slightly earthy
- Pleasant and inviting
- Intensely cocoa-like
Bad cocoa smells:
- Musty or moldy
- Sour or fermented
- Rancid (like old cooking oil)
- Completely flat with no aroma
- Like other foods (if it absorbed odors)
Taste Test (Final Confirmation)
If appearance and smell pass, you can do a small taste test.
Place a tiny amount on your tongue. Cocoa powder has a naturally bitter flavor so for this you’re checking for a moldy or funky flavor.
Fresh cocoa tastes:
- Bitter (this is normal and expected)
- Clean
- Purely chocolate-like
- Slightly astringent
Bad cocoa tastes:
- Moldy or musty
- Rancid or soapy
- Excessively sour
- Flat with no chocolate character
- Unpleasantly harsh beyond normal bitterness
Testing note: Professional taste testers at America’s Test Kitchen have conducted extensive cocoa powder aging studies. Their research found that cocoa 6 years old was notably “duller” and “weaker” than fresher powder, though still perfectly fine to consume. This means aged cocoa is safe but less flavorful—you’ll need to use more to achieve the same chocolate intensity in your baking.
When in doubt, throw it out. Cocoa powder is relatively inexpensive compared to the cost of ruined baked goods or potential health concerns.
Special Considerations for Different Cocoa Types
Natural vs. Dutch-Processed: Storage Differences
Both types require similar storage, but there are subtle differences worth noting.
Natural cocoa powder:
- More acidic (pH 5.3-5.8)
- Lighter in color
- Slightly more prone to clumping in humid conditions
- May show color changes more visibly over time
Dutch-processed cocoa:
- Neutral pH (6.9-7.9)
- Darker color
- Generally more stable in storage
- Better at maintaining color over time
Bottom line: Both need airtight containers in cool, dark places. Dutch-processed might give you slightly more leeway in humid conditions, but don’t count on it—treat both with equal care.
Raw Cacao Powder Storage
Raw cacao powder differs from regular cocoa powder in processing and nutrient content.
Key differences:
- Less processed = more temperature-sensitive
- Higher enzyme content that can degrade
- Often more expensive (storage mistakes cost more)
- Usually comes in smaller quantities
Storage adjustments:
- Aim for the cooler end of the temperature range (60-65°F)
- Consider refrigeration if your kitchen is consistently warm (but with extreme care to prevent condensation)
- Use smaller containers (raw cacao is typically used in smaller amounts)
- Pay extra attention to the “best by” date—raw products have shorter optimal freshness windows
Maximizing Freshness: Advanced Tips
The Desiccant Strategy
One of the most effective yet underutilized methods for protecting cocoa powder is the strategic use of desiccants. Research from Hill Country Chocolate on cacao preservation confirms that desiccants like silica gel packets are essential to keep the powder dry and prevent clumping or spoilage from moisture.
Think of desiccants as your 24/7 moisture guards—they continuously absorb ambient humidity inside your storage container, creating a consistently dry microenvironment even when external conditions fluctuate.
Where to get food-safe desiccants:
- Save packets from vitamin bottles, beef jerky, or packaged foods
- Purchase food-grade silica gel packets online
- Some craft stores sell them for preserving dried flowers (ensure they’re food-safe)
How many to use:
- Small container (1-2 cups cocoa): 1 packet
- Medium container (2-4 cups): 2 packets
- Large container (1+ pounds): 3-4 packets
Recharging desiccants: Silica gel packets can be reused. When they’ve absorbed moisture, bake them at 250°F for 1-2 hours to drive out moisture, then reuse.
Temperature Monitoring
If you’re serious about optimal storage, track your storage area’s temperature.
Simple method: Keep a basic thermometer in your pantry. Check it periodically, especially during season changes.
Advanced method: Use a digital thermometer with min/max memory to see temperature ranges over time. This reveals hidden problems like afternoon sun heating one wall, or heat from appliances affecting certain areas.
Seasonal Storage Adjustments
Your storage strategy may need tweaking throughout the year.
Summer:
- Move cocoa to the coolest cabinet
- Check humidity levels more frequently
- Consider basement storage if your kitchen gets hot
- Replace desiccant packets more often
Winter:
- Watch for temperature fluctuations from heating systems
- Be cautious of condensation if moving cocoa from cold to warm areas
- Lower humidity makes winter ideal for repackaging bulk cocoa
The Oxygen Absorber Advantage
For those willing to invest in long-term storage, oxygen absorbers outperform simple airtight containers.
How they work: Oxygen absorbers contain iron powder that chemically binds with oxygen, removing it from the environment. This creates a near-vacuum without mechanical vacuum sealing.
When to use them:
- Bulk cocoa you won’t use for 6+ months
- Premium cocoa you want to preserve at peak freshness
- Emergency food storage
- Gifting cocoa powder (it arrives fresh)
Where to buy: Available online in various sizes. Choose based on container volume:
- 100cc for small containers
- 300cc for quart-sized
- 500cc for gallon-sized
Troubleshooting Common Storage Problems
Problem: Cocoa Has Clumped
Severity: Mild to Moderate
Small clumps are usually fixable. Large, rock-hard clumps indicate serious moisture exposure.
Solutions:
For small clumps:
- Sift the cocoa through a fine-mesh strainer
- Break up clumps with the back of a spoon
- Transfer to a completely dry container
- Add fresh desiccant packets
For large, hard clumps:
- Assess if the cocoa still smells fresh
- If yes: Process small amounts in a food processor to break up
- Sift to remove any remaining chunks
- Store properly going forward
- If no: Discard and start fresh
Prevention:
- Always use dry measuring spoons
- Store in lower humidity areas
- Use desiccants
- Don’t return cocoa to the container if it’s been exposed to steam or moisture
Problem: Cocoa Smells Like Other Foods
Severity: Moderate
Cocoa powder is incredibly absorbent.
If the odor is mild:
- It may dissipate during baking (heat drives off some absorbed odors)
- Test in a small batch before using in important recipes
- Consider using in recipes with strong flavors (like spiced cakes)
If the odor is strong:
- Unfortunately, there’s no fixing this
- Discard and replace
- Use for composting or as a natural pest deterrent in gardens
Prevention:
- Never store cocoa near onions, garlic, spices, or coffee
- Use truly airtight containers
- Double-bag if storing in areas with strong smells
- Keep separate from cleaning products
Problem: Powder Seems Weaker in Flavor
Severity: Mild
This is natural aging, not spoilage.
Solutions:
- Increase the amount slightly in recipes (add 1-2 extra tablespoons)
- Combine with fresher cocoa powder to boost flavor
- Use in recipes where cocoa is a supporting flavor rather than the star
- Save for hot chocolate rather than delicate chocolate desserts
When to replace: If cocoa has no chocolate aroma at all, even increased amounts won’t save your baked goods. Time for fresh powder.
FAQ
Q: Can I store cocoa powder in the refrigerator or freezer?
Refrigerators are not recommended for cocoa powder storage. Condensation from temperature changes introduces moisture, causing clumping and mold, and research shows refrigerated cocoa degrades 3x faster than pantry-stored powder. However, freezing is acceptable for long-term bulk storage if you double-bag the cocoa and allow it to reach room temperature completely before opening. The ideal storage spot is a cool, dry pantry at 60-70°F.
Q: Does cocoa powder really expire, or can I use it past the “best by” date?
Cocoa powder doesn’t truly expire in the traditional sense. The “best by” date indicates peak flavor quality, not safety. Unopened cocoa powder lasts about 2–3 years, and after opening, it stays good for around 1 year if stored correctly. Beyond this, it’s still safe to consume but may have diminished flavor. Always check for mold, off odors, or extreme clumping before using older cocoa powder. When stored properly in airtight containers away from heat and moisture, cocoa powder can remain usable for several years beyond its printed date.
Q: What’s the best container for storing opened cocoa powder?
The best containers have three key features: airtight seals, light-blocking properties, and non-reactive materials. Glass jars with tight-fitting lids (like mason jars) are excellent, as are food-grade plastic containers with silicone gasket seals. For long-term storage, Mylar bags with oxygen absorbers can preserve cocoa powder for up to 20 years. Avoid the original packaging once opened, as these rarely provide adequate air-tight seals. Choose containers sized for your usage—a small working container for daily use and a larger one for bulk storage minimizes repeated exposure to air.
Q: How can I tell if my cocoa powder has gone bad?
Check for three signs: appearance, smell, and taste. Visually inspect for mold growth, gray discoloration, or persistent clumps that won’t break apart. Fresh cocoa should smell rich and chocolatey; discard if it smells sour, musty, or rancid. For taste, remember that cocoa is naturally bitter, but bad cocoa will taste moldy, flat, or unpleasantly harsh beyond normal bitterness. If you’re uncertain, it’s safer to replace questionable cocoa powder than risk ruining your baked goods or experiencing digestive issues.
Q: Should natural and Dutch-processed cocoa be stored differently?
Both types require the same basic storage conditions: airtight containers in cool, dry, dark locations at 60-70°F with humidity below 75%. However, natural cocoa powder is slightly more acidic and may be marginally more prone to clumping in humid conditions due to its pH level. Dutch-processed cocoa tends to be more stable and better at maintaining its darker color over time. Despite these minor differences, treat both types with equal care and never mix them in the same container, as they serve different baking purposes and you’ll want to distinguish between them easily.
The Takeaway
Proper cocoa powder storage isn’t complicated, but it does require attention to a few key principles: airtight containers, cool temperatures between 60-70°F, humidity below 75%, and protection from light and heat. By transferring cocoa powder from its original packaging to quality airtight containers, storing it in a cool dark pantry away from heat sources, and using desiccant packets in humid climates, you’ll preserve that rich chocolate flavor and silky texture for a year or more after opening.
The difference between well-stored and poorly stored cocoa powder becomes obvious the moment you bake with it. Fresh, properly stored cocoa produces brownies with deep chocolate intensity, cakes with rich color, and frostings with smooth texture. Meanwhile, degraded cocoa results in pale, weak-flavored desserts that disappoint no matter how perfectly you follow the recipe.
Whether you’re a daily baker or someone who reaches for cocoa powder once a season, these storage strategies ensure your chocolate creations always taste their best. The small investment in proper containers and a few minutes spent on correct storage pays off every single time you bake.
Now I’d love to hear from you: What’s your biggest cocoa powder storage challenge? Have you discovered any clever storage tricks that work in your climate? Share your experiences in the comments below!
Our Authority Sources
Santa Barbara Chocolate Professional chocolate manufacturer providing detailed shelf-life data and storage guidelines based on commercial chocolate production standards. Their research on cocoa powder preservation includes specific temperature ranges, humidity requirements, and information about polyphenol stability that affects both flavor and health benefits.
The Kitchn Trusted cooking website with extensive testing protocols for food storage methods. Their chocolate storage research includes practical insights from professional test kitchens about different chocolate forms, including powder, chips, and bars, with real-world storage testing results.
Clemson University Home & Garden Information Center Academic extension service providing science-based food storage information. Their chocolate storage guidelines are backed by food science research, including detailed explanations of oxidation processes, optimal humidity levels, and temperature requirements for preserving chocolate quality.
Hill Country Chocolate Artisan chocolate producer specializing in cacao preservation techniques. Their research focuses on maintaining the antioxidant properties and flavor compounds in cacao and cocoa powder through proper storage, including data on degradation rates under various storage conditions.
America’s Test Kitchen Professional cooking publication known for rigorous product testing and food science research. Their cocoa powder studies include comparative taste tests of properly versus improperly stored cocoa, providing empirical evidence about flavor degradation over time and optimal storage methods.