
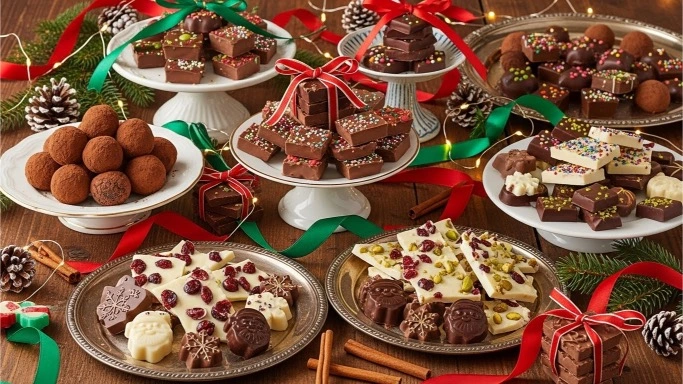
There’s nothing quite like Christmas chocolates. Whether it’s wrapped under the tree, melting into a cozy drink, or shaped into bite-sized gifts, chocolate captures everything we love about the holidays — comfort, joy, and a touch of indulgence.
The best part? You don’t need to be a chocolatier to make beautiful, homemade Christmas chocolates that taste (and look) incredible. From creamy truffles to peppermint bark and spiced cocoa spoons, this is your complete guide to creating edible holiday magic right in your kitchen.
So put on your favorite holiday playlist, grab a mixing bowl, and let’s make this the year your chocolates become everyone’s favorite Christmas memory.
If you’d rather sip your sweets, check out How to Make a Christmas Hot Chocolate Bar for another festive idea.
Why Homemade Christmas Chocolates Are Worth It
Homemade chocolates bring a warmth that store-bought boxes just can’t match. They’re customizable, heartfelt, and smell amazing while you make them. Plus, they’re surprisingly cost-friendly — you can create gourmet gifts with just a few quality ingredients.
And let’s be honest — nothing beats the reaction of friends and family when you say, “I made these myself.”
Beyond the joy of gifting, making chocolate at home lets you control ingredients: dark vs. milk, low-sugar options, vegan alternatives, or even functional add-ins like nuts, berries, and sea salt.
To explore how those antioxidants work, read Health Benefits of Cocoa Powder: Antioxidants, Energy, and More.
Step 1: Choose the Right Chocolate
Before diving into recipes, start with quality ingredients. The chocolate you choose determines the texture, shine, and flavor of your final creations.
1. Dark Chocolate (70% or higher)
Rich and sophisticated — perfect for truffles, bark, or ganache. It’s also the healthiest option, full of antioxidants.
2. Milk Chocolate
Sweeter and creamier, ideal for crowd-pleasing bonbons and molded chocolates.
3. White Chocolate
Technically not “true chocolate” since it lacks cocoa solids, but it adds elegance and pairs beautifully with peppermint or berries.
Learn how to handle each type properly in How to Store Chocolate to Keep It Fresh: Tips from Experts.
Step 2: Master the Basics of Tempering
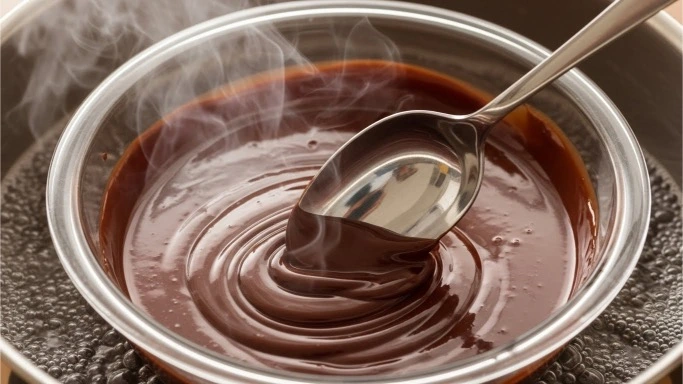
Tempering is the secret behind that perfect glossy snap. It’s easier than it sounds — you just need to melt, cool, and reheat chocolate precisely.
Simple seeding method:
- Chop 12 oz (340 g) of chocolate.
- Melt two-thirds over a double boiler (115 °F / 46 °C for dark; 110 °F / 43 °C for milk or white).
- Remove from heat and stir in the remaining third.
- Cool to about 88–90 °F (31–32 °C).
Now your chocolate is ready for dipping, coating, or molding.
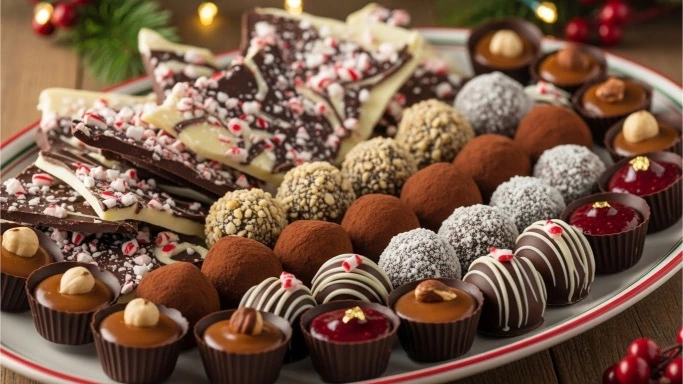
Step 3: Classic Christmas Chocolate Recipes
Here are five tried-and-true chocolate recipes that capture the holiday spirit.
1. Peppermint Chocolate Bark
A festive favorite — easy, fast, and perfect for gifting.
Ingredients:
- 12 oz dark chocolate, chopped
- 8 oz white chocolate, chopped
- 4 crushed candy canes
Method:
- Melt dark chocolate, pour onto parchment, spread evenly.
- Chill for 10 min.
- Melt white chocolate, pour on top, and swirl.
- Sprinkle candy canes before it sets.
Break into pieces once firm.
For packaging ideas, see How to Make Christmas Chocolate Gifts.
2. Spiced Hot Chocolate Spoons
These are fun, creative, and make perfect stocking stuffers.
Ingredients:
- 8 oz milk chocolate
- ½ tsp cinnamon
- ¼ tsp chili powder
- Mini marshmallows
Method:
- Melt chocolate with spices.
- Pour into silicone molds or mini paper cups.
- Insert wooden spoons and chill until set.
- Wrap individually in clear cellophane.
Stir into hot milk for an instant cozy drink.
3. Hazelnut Chocolate Truffles
Elegant and irresistibly smooth.
Ingredients:
- 8 oz dark chocolate
- ½ cup heavy cream
- 2 tbsp butter
- ½ cup crushed hazelnuts
Method:
- Heat cream, pour over chocolate, and stir until glossy.
- Add butter, then chill for 2 hours.
- Roll into balls and coat in nuts or cocoa powder.
For a cake-inspired twist, try our The Best Chocolate Strawberry Cake You’ll Ever Make.
4. Salted Caramel Chocolate Cups
Sweet, salty, and melt-in-your-mouth delicious.
Ingredients:
- 10 oz milk chocolate
- ¼ cup caramel sauce
- Sea salt flakes
Method:
- Pour a spoon of melted chocolate into mini liners.
- Chill 5 minutes, add a small caramel drop.
- Cover with more chocolate and sprinkle sea salt.
Let set, then box in gold wrappers for gifting.
5. White Chocolate Cranberry Clusters
A lighter treat with a tangy twist.
Ingredients:
- 8 oz white chocolate
- ½ cup dried cranberries
- ½ cup toasted almonds
Method:
- Melt chocolate, stir in mix-ins.
- Drop spoonfuls onto parchment.
- Chill 30 minutes, then package in jars or tins.
Pair this with festive drinks like Sip the Spirit: How to Make the Perfect Christmas Cocoa.
Step 4: Presentation and Gifting Ideas

Presentation matters as much as flavor. Luckily, chocolate is easy to dress up.
Wrapping Ideas
- Clear cellophane bags tied with red ribbons.
- Mason jars filled with bark or clusters.
- Mini tins lined with parchment.
- Kraft paper boxes with handwritten tags.
Add sprigs of pine, cinnamon sticks, or candy canes for that extra festive touch.
Step 5: Pro Tips for Perfect Results
- Use real chocolate, not candy melts. The flavor difference is huge.
- Avoid water contact — even one drop can make chocolate seize.
- Chill strategically. Too cold = dull chocolate. Set at room temperature, then refrigerate briefly.
- Store correctly. Keep in airtight containers in a cool, dry place.
See how chocolate’s texture and shelf life change in Does Cocoa Powder Go Bad? How to Tell If It’s Still Good.
Step 6: Add a Healthy (But Delicious) Twist
Not all holiday treats need to be sugar bombs. Add nutrition without losing flavor:
- Use dark chocolate with 85% cocoa — richer and lower in sugar.
- Add nuts and seeds for healthy fats.
- Incorporate freeze-dried fruit for color and antioxidants.
- Sweeten naturally with honey or maple syrup.
Find balance and moderation tips on Sweet Freedom — How to Reduce Sugar and Unlock Better Health.
Step 7: Storing and Shelf Life
Proper storage keeps your chocolates looking shiny and tasting fresh.
- Truffles: Up to 2 weeks in the refrigerator.
- Bark and clusters: 3–4 weeks airtight at room temperature.
- Chocolate cups: Up to 1 month refrigerated.
Keep away from direct sunlight and humidity to prevent “bloom” (the white film that forms when cocoa butter separates).
Step 8: Pair Your Chocolates
Make your creations even more impressive by serving or gifting them with thoughtful pairings:
- Wine: Red wines like Merlot or Pinot Noir pair beautifully with dark chocolate.
- Coffee: Espresso amplifies bitterness and depth.
- Tea: Earl Grey or peppermint balances sweetness.
Step 9: Make It a Family Tradition
Homemade Christmas chocolates aren’t just recipes — they’re memories in the making. Invite kids to decorate bark, let teens roll truffles, and play your family’s favorite playlist while you wrap everything together.
Chocolate has this unique way of bringing generations together — and every year you’ll find new variations to try.
For more fun family-friendly recipes, visit Chocolate Graham Crackers.
The Takeaway
The beauty of homemade Christmas chocolates lies in their simplicity — a handful of ingredients, a bit of creativity, and a lot of love.
From peppermint bark to spiced spoons, every recipe here can become part of your new holiday tradition. They’re easy to make, delightful to gift, and impossible to resist.
So melt, stir, wrap, and share — because nothing spreads Christmas cheer quite like chocolate made by hand and heart.
Discover more chocolate wisdom on ChocoTalks.com — where every bite tells a story.